Photoshop Contest Forum Index - Tutorials - A simple "noise" trick - Reply to topic
Goto page 1, 2 Next
|
|
 Tue Mar 17, 2009 1:33 pm Reply with quote Tue Mar 17, 2009 1:33 pm Reply with quote
Sjitske PMed me. He looked at my last entry's PSD file and learned how to make a noise layer.
I figure this little trick can maybe help you too...
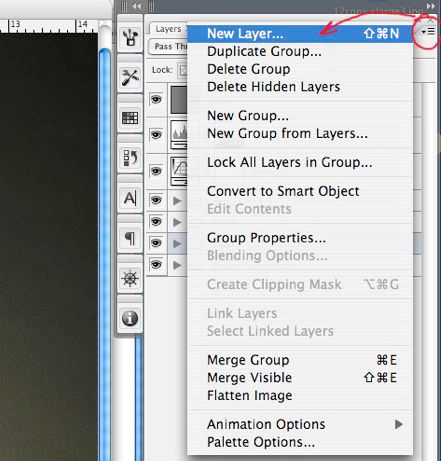
1. First step, make a new layer from the top corner...
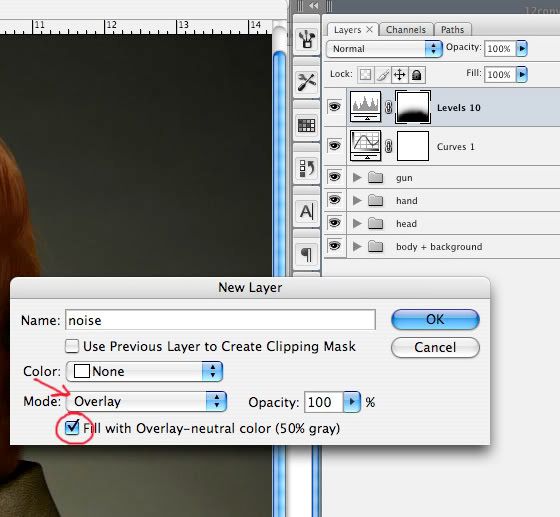
2. Set that layer in "overlay" mode and fill with 50% gray...
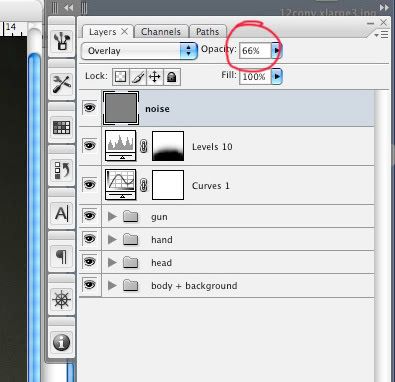
3. Add noise to the layer, set the amount the way you like...
4. And you can bring few adjustments to that new layer. Changing opacity for softer mood... sometimes I add a very soft blur to it, or hue/saturation for low saturation if you feel the noise too colorful...
It is especially very useful on high resolution pictures, when a lot of stamp tool or brushes were used... just to bring back the original feel over the whole image... on every details.

|
marcoballistic

Location: I am everywhere, and Nowhere, but mostly, I am right here!
|
Tue Mar 17, 2009 1:41 pm Reply with quote
that it is monsieur Claude, good little tutorial for people not in the know, this can be put in the tutorials section for sure with minor adjustments
nice one 
|
|
|
Tue Mar 17, 2009 1:42 pm Reply with quote
i told you the dutch are great btw i dont understand this at all but i am a cut and paste man, i have other qualities i hope, but its very usefull fore people who are involved with this ps stuf
|
dewdew

Location: Upstate South Kack-a-lack
|
Tue Mar 17, 2009 5:51 pm Reply with quote
See's the Graphs in the Layers panel..... 
Holy cow...  ....they have a MATH edition of PS ?
I'm still in Art class and now you tell me i have to know algebra too. 
Candron  ...cut and paste.... You nut....you have too much Artistic Talent now...We have to limit you to the cut and paste version to keep it fair. 
That's the lie i keep telling me anyway. Works too. 
|
|
|
Tue Mar 17, 2009 11:23 pm Reply with quote
This worked really really really well. Thanks for the excellent pointer
|
ReinMan

Location: Kingston, ONTARIO, CAN
|
Wed Mar 18, 2009 9:54 am Reply with quote
To Add to Claf's Very Cool & Interesting Mini-TUT:
If you do the same thing with the 50% gray / OVERLAY layer but then use the BURN and/or DODGE tool on it, you'll lighten or darken the image underneath it WITHOUT hurting any pixels (except for the 50% gray layer).
So, basically, whatever you do to that GRAY layer, as far as Light and Dark go, happens to what is underneath it. If you seriously screw up (and you KNOW you will at some point ) you can just fill that layer again with 50% Gray and try again. 
_________________
_________________________________
THIS SITE REALLY DOESN'T EXIST
the way our EGO THINKS IT MIGHT!
_________________________________
|
YerPalAl

Location: On Deck, South by Southeast
|
Wed Mar 18, 2009 9:56 am Reply with quote
Very cool tip, thank you.
One can always learn here, one reason I love this place.
_________________ YerPalAl
--------------------------------------------------------------------------------
I'm highly motivated to be un-ambitious today.
|
FootFungas

Location: East Coast!
|
Wed Mar 18, 2009 1:42 pm Reply with quote
I love 50% gray! 808080 all the way!
_________________
Look out behind you!
|
kinetic_be

Location: Belgium
|
Wed Mar 18, 2009 1:55 pm Reply with quote
ReinMan wrote: To Add to Claf's Very Cool & Interesting Mini-TUT:
If you do the same thing with the 50% gray / OVERLAY layer but then use the BURN and/or DODGE tool on it, you'll lighten or darken the image underneath it WITHOUT hurting any pixels (except for the 50% gray layer).
So, basically, whatever you do to that GRAY layer, as far as Light and Dark go, happens to what is underneath it. If you seriously screw up (and you KNOW you will at some point ) you can just fill that layer again with 50% Gray and try again.
That's a nice extra to the tutorial!
Thanks both Claf and Reinman.
|
Mir

Location: Malta E.U.
|
Thu May 14, 2009 11:26 am Reply with quote
Please add to the tutorial section, it's these little things that make the difference. Thanks Guys.
|
TheShaman

Location: Peaksville, Southeast of Disorder
|
Fri Jun 12, 2009 9:10 am Reply with quote
ReinMan wrote: To Add to Claf's Very Cool & Interesting Mini-TUT:
If you do the same thing with the 50% gray / OVERLAY layer but then use the BURN and/or DODGE tool on it, you'll lighten or darken the image underneath it WITHOUT hurting any pixels (except for the 50% gray layer).
So, basically, whatever you do to that GRAY layer, as far as Light and Dark go, happens to what is underneath it. If you seriously screw up (and you KNOW you will at some point ) you can just fill that layer again with 50% Gray and try again.
can also set it to hard light 
Love this technique for changing highlights & shadows!!!
BIG thanks to FootFungas for this little tip years ago.
|
carmine665

Location: ...down at the bottom of a pit in the blazing sun...
|
Fri Jun 12, 2009 10:29 am Reply with quote
Very cool tips. Thanks Claf and Rein.
Knew about the trick Rein stated. It works very well. (cuz I screw up constantly.)
And didn't know about Clafs tip. I tried it and it works very well.
Thanks again!
_________________ Be safe,
Carmine
_________________
The will of God will never take you where the Grace of God will not protect you.
|
ReinMan
Location: Kingston, ONTARIO, CAN
|
Fri Jun 12, 2009 11:05 am Reply with quote
carmine665 wrote: Very cool tips. Thanks Claf and Rein.
Knew about the trick Rein stated. It works very well. (cuz I screw up constantly.)
And didn't know about Clafs tip. I tried it and it works very well.
Thanks again!
Basically that 50% gray layer can have any effect on it that works with LUMINENCE (dark or light). And, again the benefit: it won't hurt your original pixels! So it is a very useful trick.
If people are interested I am willing to do a ScreenCast tutorial of this - it will be a good excuse to try out my new TUTORIAL CREATION MACHINE.
_________________
_________________________________
THIS SITE REALLY DOESN'T EXIST
the way our EGO THINKS IT MIGHT!
_________________________________
|
ScionShade

Location: VeniceFlaUS
|
Fri Jun 12, 2009 11:14 am Reply with quote
Yeah yeah yeah. Just do it.
Don't forget to throw in some extras that are important to newbs that don't get discussed much.
Like linking layers, and how to turn a selection into a path.
Aint you in the Scav?
|
Goto page 1, 2 Next
Photoshop Contest Forum Index - Tutorials - A simple "noise" trick - Reply to topic
You cannot post new topics in this forum
You cannot reply to topics in this forum
You cannot edit your posts in this forum
You cannot delete your posts in this forum
You cannot vote in polls in this forum
|