By: ledirlo
Color modes , luminosity, and printing basics
Light is the basis of photography, therefore it's the part one has to master
in order to produce consistent pics, but it is also the toughest part.From
correcting the colors, the exposition, painting the highlights and shadows,
and/or reflections, handling glossiness, light should be the center of your
preocupations.
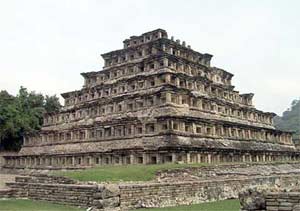
This photo was quickly enhanced : the overlay mode lets you emphasize every
aspect of the pic, and is very usefull to add definition and to raise the
overall contrast, but it also tends to saturate/flatten the colors.
The first thing to notice in a pic is the nature of the lights it contains:
is it a direct light (a bulb or spotlight), an ambient light ( like in a
very foggy weather), or a sunlight, or a non dirct light ( when an object
receives the light from another object, by reflection, ie a person receives
light from a white wall, or a gobo).Each type of light has its own ways
to diffuse colors, create highlights and shadows, etc.
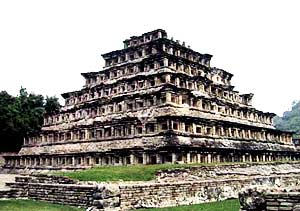
Important: you have to be aware that all these enhancements are made without
taking care of the printing process, and especially shadows and highlights
need adjustment to be printed properly.Using the overlay mode often saturates
the colors, which may not be visible on a monitor, but will give horrible
results on paper: ie, a saturated highlight will give a white, unprinted
stain on the paper.
Anyway
you have to make the luminosity of the shadows/highlights match the one
of the pic you work on.A pic with low contrast, but highly contrasted shadows/highlights
will suck, try to abuse the levels on a random pic to have an idea of the
result.
Photoshop was invented before web graphics , and was develloped in order
to fullfill the needs of prepress operators; the web graphic designers do
not have to deal with other color modes than RGB and web color modes, which
means they handle Photoshop in the easiest way they can, unless they have
to submit a printed project before they start working.In this case, they
need to handle CMYK, and alter the colors in their pic so they are printed
correctly :A job in itself, ask Jerry717.
Each
work space has uses its own color mode:
-The monitor
uses additive color, composed of combinations of red, green and blue,
emited from the monitor.
-A
printer uses substractive colors, composed of combinations of Cyan, Magenta,
Yellow and Black, which are the colors of the inks used by the printers.the
range of colors they can produce (gamut) is narrower than the one of RGB.This
is why some colors produced on a monitor in RGB mode will not be printed
at all.
-Photoshop
uses the LAB mode, which contains all the other existing modes.It means
that the LAB mode has the widest gamut, containing all the colors available.L
stands for luminosity, A is the green/red value, and B is the blue/yellow
value.The programm uses this mode every time you convert a pic from a
color mode to another, so it has absolute values.
Having to handle these modes will make you use photoshop commands and
options you may have never heard of, though they exist for sure.Let's
try something: imagine you have chopped a nice pic for an ad that will
be printed in a magazine.You've been working as usually in RGB, and you
convert it to CMYK before you send it to the printer.If you think your
work is over you have 90% of chances not to get paid.For the example I
took a pic I made some time ago, no showoff intended, just an example...
I
saturated the colors a bit so what I want to demonstrate becomes obvious.the
original is pic 3.Pic 4 is what you get when you set the proof colors
options on, with for example the japan 2001 coated profile, and gamut
warning on.
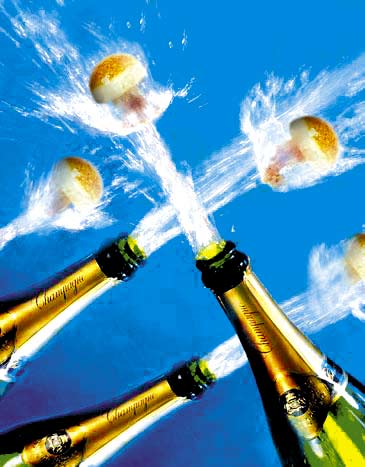
pic3
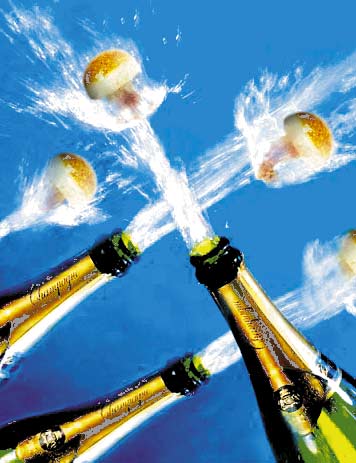
pic4
Now you see how the pic that looked so nice on your monitor would end
up once printed on a japanese printer.The gamut warning shows you that
some colors just wont even be printed, flattening highlights and shadows.Here,
the usual RGB tricks don't work.You have to correct each color channel
to desaturate it, so its luminosity can be printed: you can do it in so
many possible ways that I'll only mention a few; you can use the replace
color command, or the levels/curves/hue commands on a selected color,
or channel, you can paint over the unmatching color, use some blending
modes tricks...The best solution would have been to start working on the
pic in the proper mode, with the proof color and gamut warning options
on.
Whatever
the calibration device you use, you'll always have to proof your pic by
printing it on the printer's device, because the way printers handle colors
is different from one printer to another, even if the printer's model
is the same.That's why I say that amateurish and professionnal photoshopping
are totally different: working in RGB, 72 ppi, allows one to make technically
sharp pics, but having to work in CMYK 300 ppi (at least), having to prepare,
correct and enhance the colors, and proof them wont let one a single second
for creative research.The fact is there are thousands of good photoshoppers
on the market, considering themselves as "above the rest", or
avant-garde, but there are no jobs for them, unless they are asked to
produce graphics that will only be displayed on a monitor.Using 50% of
the program doesn't make them professionnal choppers, and they wont be
allowed to express their creativity unless they can make their pics look
good on paper (try view/proof setup/simulate paper black/ink black to
have an idea of the result).
Also , for
PC users, try ctrl+shift+K, and set the working space to rgb Apple, to
see how your pics look on a Mac monitor...surprise ! :D
� all photoshop tutorials
|