By: armogeden
This is a tutorial to show you how to transform animals into other animals
by using the liquify filter and for those of you who want and actual example,
how I made this picture:
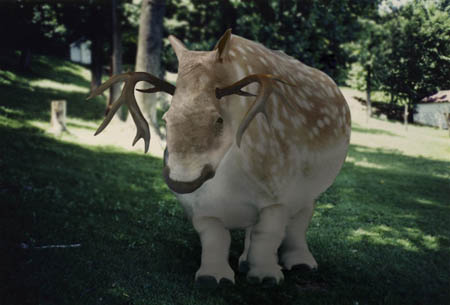
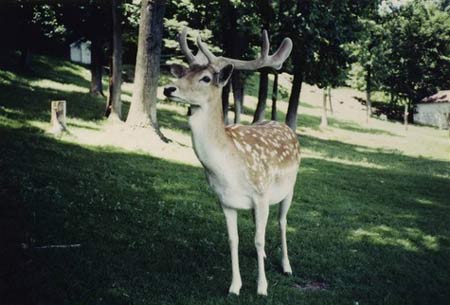
first things first. get the picture of the animal you wish to transform (i'll
call this animal1 for clarity). heres mine
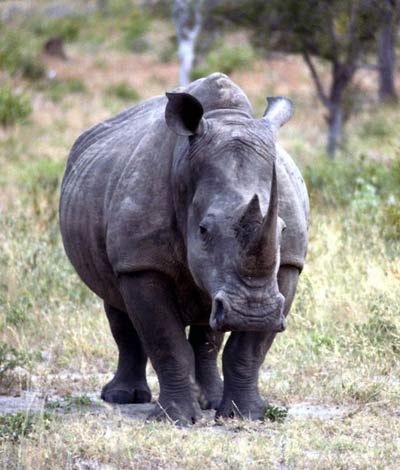
now find a picture of the animal (i'll call animal2) you want to transform
animal1 into. there are a few things you should follow when doing this as it
makes this process a lot easier.
- animal2 should be BIGGER than animal1; hence i used a rhino for 2 and a
deer for 1.
- to make this easier on you find a picture of animal2 that is in the same
position as animal1 (as near as you can get it)
- the pictures should be roughly the same resolution (doesn't matter so much
if you can't get a pic like this but it helps)
- thats all i can think of at this moment....
this is what i found on google images
ok now import both animal pictures into photoshop like so
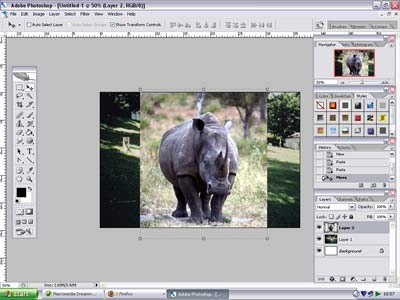
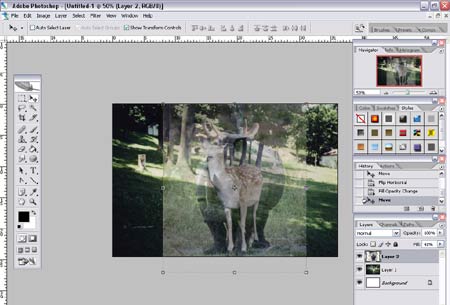
easy enough? ok. now i'm going to select the rhino and hit edit>transform>flip
horizontal so its facing the same way. reduce the opacity of the
rhino to around 50% or so and position the rhino's body "in the middle"
of the deer's body like this
now click the eye next to the rhino's layer to make it dissapear. we'll be
working on the body first so using the polygonal lasoo tool (keep
hitting L until you find it) draw a ring around the deer's body (i used the
pen tool but i dont fancy explaining it). now with that ring
and the deer's layer selected, hit ctrl+j to make a new layer from
the selection, or you can go to layer>new>layer via copy.
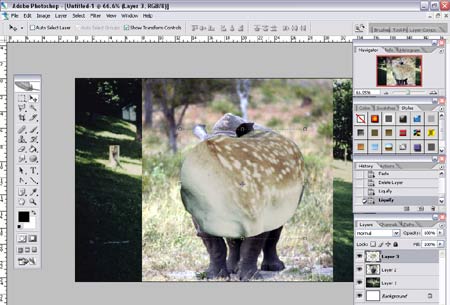
now select the new layer and rename it to body. rearange the layers
so animal1 is on the bottom, then the rhino layer, then the body layer is on
top. select the move tool (hotkey V) and resize the body until it is roughly
the same size as the rhinos body.
then go to filter>liquify or press shift+ctrl+x.
select show backdrop you can choose which layer to use as the
backdrop. for this choose layer 2 or the layer which has animal2 on it and change
it to being infront and opacity around 55.
this is a list of tools built in the the liquify filter and basicly what they
do. i'll try to be as accurate as possible.
the liquify filter tools
warp tool (w) or the forward warp tool (w) depends on the version of photoshop
much like the smudge tool, although tends not to lose sharpness or details.
all together more accurate.
turbulence tool (a)
acts a bit like a brush jitter. great for distortion but thats about it. as
far as im concerned not so usefull.
twirl clockwise tool (r)
acts like the distort>twirl filter only in brush form if
that makes sense. if it doesn't dont worry it's pretty self explanitry.
twirl counter clockwise tool (l)
i would hope this is self explanitry
pucker tool (p)
works as a brush retracting pixels from the edge (i think i can say that)
the basic effect of which it that you can shrink areas.
bloat tool (b)
works the opposite effect of the pucker tool and enlarges
area. its works partly like the distort>spherise filter (i
think thats what it's called, its too late at night)
shift pixels tool (s)
works like the warp tool apart from it tends to shift whole blocks of pixels
in a certain way instead of the center. takes practise and patience of which
i have neither.
reflection tool (m)
the only use i found for this is creating refraction in glass, but it only
works in somesituations and its a b*tch to get right ('scuse my french)
reconstruct tool (e)
surprisingly usefull. reconstructs parts which you have just 'liquified'.
main uses are getting back wrongfully changed parts while not reconstructing
the WHOLE image. you'll know what i mean when you use it.
masks- freeze tool (f)
it stops the tools having any effect on cerain areas of the picture- define
these areas with this brush (represented by red)
masks- thaw tool (t)
it removes parts of the 'masking' you just put on with the freeze
tool
on with the show. get a large brush (i used size 312 pressure 100 and density
27) and use the forward warp tool (w) to fit the deer's body
to the exact shape of the rhino's body. i came out with this
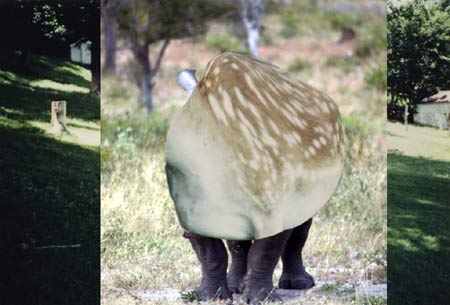
try not to stretch the fur too much other wise it will look strange (the one
above isn't the best example but this is just a guideline). i reccomend using
short strokes with the large brush stated above. roughly speaking, the large
the brush, the more natural it looks but the less precise.
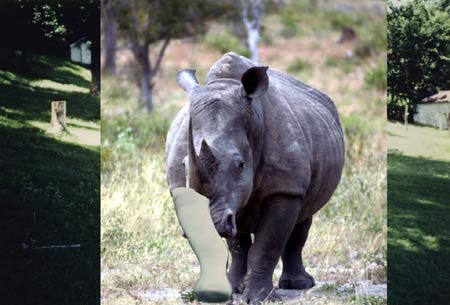
now for the legs. cut them out from the deer's layer and copy each one into
a new layer and name the layers accordingly. using the first leg (i chose the
one on the very left) rotate and scale to roughly fit the rhino's leg, then
go into liquify once again. choose a brush about 150% bigger than the width
of the rhinos leg, choose the bloat tool (b) then
click on the bottom of the leg and just drag the mouse upwards, because it tends
to thicken the leg so the aproximate size of the rhino. then choose the forward
warp tool again and matches the sizes of the leg exactly. it should
look like this when your done
repeat the process for the remaining legs. we will get onto detail in the legs
later. on the final thing my legs looked like this
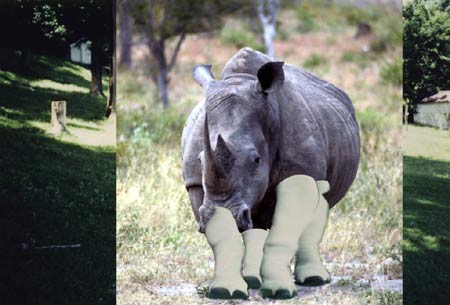
now the head bit is probably the hardest part. using the polygonal
lasoo tool copy the head of the rhino into a new layer. select the
healing brush tool (j) and remove the rhino's horn (alt-click
to define source of skin close to the part of the horn that you are dealing
with. if you do not know how to use the tool i suggest tht you follow another
tutorial for it as i'm not going to explain it here). anyways, my rhino head
now looks like this (just rough version):
also, try shaping the mouth of the rhino to the rough shape of the deer <took
me a while
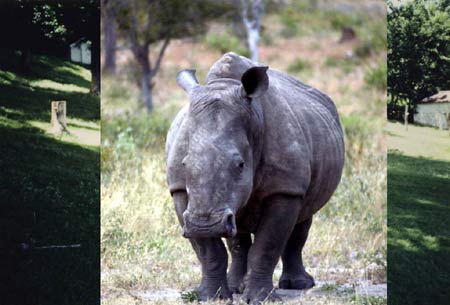
to colour in the head, make only the new head layer and the deer layer visible,
and try to copy the colour tones over by:
- making a new layer and tranform it into a clipping mask for the head layer
- eyedropping the colour of fur needed off the deer head
- selecting a fairly soft brush and any size of brush. select the mode of
the brush to colour
- paint away
- add extra detail as nessessary eg. white spots from deer coat.
mine now looks like this
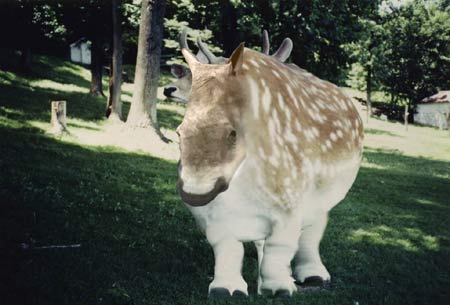
oh ps: i shaped the head more to look like the deer. save your work before
the next part
anyway on with the tut. merge the colour clipping mask to the head layer and
duplicate the head layer. merge one head onto the body layer. try to blend the
merged head to the body you just merged it to. i just figured out quite a neat
trick. where you want to join the features then choose smudge and click and
wiggle the mouse over the part. however, blending it loses the head's detail
hence why we copied the head layer. make that layer visible and place it above
the body layer. if it still looks not joined then only smdge it very slightly
right of the head. et voila.
next steps to do
- fix background
- add atlers
- adjust antlers lighting
- adjust deer lighting
- add detail.
fixing background
this is quite hard to get right thank god its only a smal section to do
whip out your healing tool and cover up the deer with bits of tree? i don't
know what ever fits. you could ship it into a new background and it would be
a lot easier. it's your desicion.
add antlers
i managed to find a decent source picture for this:
antlers
so all i did was cut it out paste them onto separate layers. for the lighting
conditions you notice that we have some highlights that we dont want hence make
sure you have no other layers visible, and go to select>colour range
and eye drop the brightest highlight you can find then adjust the fuziness untill
all the unwanted highlights are selected. then reduce the brightness of them
untill they appear grey. job done. if you want you can colour them in with the
same colour of the rest of the antlers for realism but there is no need.
lighting
the best advice i can give you is to look at the deer, look at the background,
look at where the sun is coming into the picture from etc. I made a new layer
on top and added highlights and shadows. i would refrain from using the burn
and dodge tools.
details
add any amount of detail you wish. theres a million different things you can
add in the way of detail. pick them up for yourself from the original deer pic.
i fiddled around with the details, lighting etc. and got this:
here is a list of things i thought of that you can add
- fur 'stumps'
- extra fur details
- extra lighting reflections
- lens burring
- dusty streams of light
- erm... thats about all i can think of
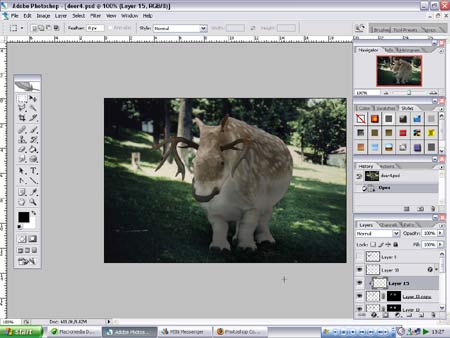
and were done here. if there was anything you didn't understand here just PM
me or something. appologies if you didnt understand some steps i tried to explain it well.
liquifying is mainly about experimenting. practice it and you will be able
to use it effectively.
� all photoshop tutorials
|