Photoshop Contest Forum Index - Ask the Experts - defaulting ERASER tool to background - Reply to topic
Goto page Previous 1, 2, 3 Next
|
|
 Wed Feb 18, 2009 9:39 am Reply with quote Wed Feb 18, 2009 9:39 am Reply with quote
no...
if PSC has a bench in a contest like WOODEN FIGURES
Can i make a path around the bench and save it.
THEN....
PSC has a contest called FROG FOUNTAIN where ther happens to be another bench. I wanna call up my saved "bench path" and use it in the new competition.
If i put it in the frog picture and edit all the nodes so it fits the new bench, thats what i want.
So in other words, a path edit function like this:
PATH>SAVE PATH>SAVE AS OBJECT>.......bench path.PPO (extension Photoshop Path Object)
You know how i could save a pattern using DEFINE PATTERN? I want to save a path for use later.
|
TofuTheGreat

Location: Back where I belong.
|
 Wed Feb 18, 2009 9:46 am Reply with quote Wed Feb 18, 2009 9:46 am Reply with quote
Drumstix71 wrote: no...
if PSC has a bench in a contest like WOODEN FIGURES
Can i make a path around the bench and save it.
THEN....
PSC has a contest called FROG FOUNTAIN where ther happens to be another bench. I wanna call up my saved "bench path" and use it in the new competition.
If i put it in the frog picture and edit all the nodes so it fits the new bench, thats what i want.
So in other words, a path edit function like this:
PATH>SAVE PATH>SAVE AS OBJECT>.......bench path.PPO (extension Photoshop Path Object)
You know how i could save a pattern using DEFINE PATTERN? I want to save a path for use later.
Um. Why would you do this? Seems like you'd have to be extracting two identical benches from two different photos. If you need a starting path just draw a rectangle or circle path and then add anchor points to it I suppose.
_________________ Why I do believe it's pants-less o'clock! - Lar deSouza
”The mind is like a parachute, it doesn’t work if it isn’t open.” - Frank Zappa
Created using photoshop and absolutely no talent. - reyrey
|
tomcol6

Location: UK
|
 Wed Feb 18, 2009 10:11 am Reply with quote Wed Feb 18, 2009 10:11 am Reply with quote
Lorem ipsum dolor sit amet, consectetur adipiscing elit. Phasellus lacus dolor, suscipit eget, porta sed, congue eu, enim.
|
ReinMan

Location: Kingston, ONTARIO, CAN
|
 Wed Feb 18, 2009 10:54 am Reply with quote Wed Feb 18, 2009 10:54 am Reply with quote
Howdy. Happy PEN TOOL ENTHUSIAST here: the pen tool rocks... it is a SERIOUS and PROFESSIONAL tool. Guess what? It takes some practice. We spent an ENTIRE WHOLE DAY (yes, 5 hours!!) at college learning this tool. We had to trace the living shite out of many different things until we could do it with our eyes (almost) closed.
My point? If you give this some practice you won't NEED to save paths too often. Every bench is NOT created the same - but you'll be so good at tracing with the pen tool you'll just whip through the new bench trace in a few minutes.
There are WAY TOO MANY ways in Photoshop to remove objects from their backgrounds (in the right situation, that Background Eraser tool can work wonders). But if you got a fairly sharp object with solid edges NOTHING will beat that pen tool.
BONUS TIP!!!!! After creating a mask from your trace, and then cutting out the object (Cmmnd+J) / (CNTRL+J) us the BLUR TOOL set on VERY LOW strength and with a VERY SMALL diameter to gently blur the edge of your cut-out. It will help it sit in the background much better (unless you screw up and over blur it - then you'll have a mess on your hands and you'll need to be spanked!!)

_________________
_________________________________
THIS SITE REALLY DOESN'T EXIST
the way our EGO THINKS IT MIGHT!
_________________________________
|
dewdew

Location: Upstate South Kack-a-lack
|
 Wed Feb 18, 2009 1:32 pm Reply with quote Wed Feb 18, 2009 1:32 pm Reply with quote
I need to be spanked..  I blur'D the shit out of mine.  Looks like this ---> 
|
TheShaman

Location: Peaksville, Southeast of Disorder
|
 Wed Feb 18, 2009 2:11 pm Reply with quote Wed Feb 18, 2009 2:11 pm Reply with quote
yep yep... The pen tool is your friend!
ReinMan wrote:
BONUS TIP!!!!! After creating a mask from your trace, and then cutting out the object (Cmmnd+J) / (CNTRL+J) us the BLUR TOOL set on VERY LOW strength and with a VERY SMALL diameter to gently blur the edge of your cut-out. It will help it sit in the background much better (unless you screw up and over blur it - then you'll have a mess on your hands and you'll need to be spanked!!)

OR you can add a vector mask and mask out the edges using a fuzzy edged brush at a low opacity, and get the same effect w/o screwing up your image at all... you can always go back and unmask, you can't go back and unblur.
|
ReinMan

Location: Kingston, ONTARIO, CAN
|
 Wed Feb 18, 2009 2:14 pm Reply with quote Wed Feb 18, 2009 2:14 pm Reply with quote
TheShaman wrote: yep yep... The pen tool is your friend!
ReinMan wrote:
BONUS TIP!!!!! After creating a mask from your trace, and then cutting out the object (Cmmnd+J) / (CNTRL+J) us the BLUR TOOL set on VERY LOW strength and with a VERY SMALL diameter to gently blur the edge of your cut-out. It will help it sit in the background much better (unless you screw up and over blur it - then you'll have a mess on your hands and you'll need to be spanked!!)

OR you can add a vector mask and mask out the edges using a fuzzy edged brush at a low opacity, and get the same effect w/o screwing up your image at all... you can always go back and unmask, you can't go back and unblur.
Shaman is absolutely right. And since he opened that VectorMask Thang, I'll let HIM explain it to you!  
_________________
_________________________________
THIS SITE REALLY DOESN'T EXIST
the way our EGO THINKS IT MIGHT!
_________________________________
|
TheShaman

Location: Peaksville, Southeast of Disorder
|
 Wed Feb 18, 2009 2:21 pm Reply with quote Wed Feb 18, 2009 2:21 pm Reply with quote
ReinMan wrote:
Shaman is absolutely right. And since he opened that VectorMask Thang, I'll let HIM explain it to you!  
thanks brother Rein... but I suck at splainin things...
|
ReinMan

Location: Kingston, ONTARIO, CAN
|
 Wed Feb 18, 2009 2:49 pm Reply with quote Wed Feb 18, 2009 2:49 pm Reply with quote
TheShaman wrote: ReinMan wrote:
Shaman is absolutely right. And since he opened that VectorMask Thang, I'll let HIM explain it to you!  
thanks brother Rein... but I suck at splainin things...
*LOOKS FOR "CHICKEN" EMOTICON*  .
.
.
What Shaman is going on about (well, actually NOT going on about  ) is the fact that by using the Very Powerful Layer Masking tools, you can do stuff to the edges that are not PERMANENT pixel changing stuff.
BUT: to be clear... I have found that to get the effect I'm talking about you need a CLEAN CUT first, and then blur. Otherwise, if you just blur the "hiding mask" you'll possibly see bits of the background from that layer.
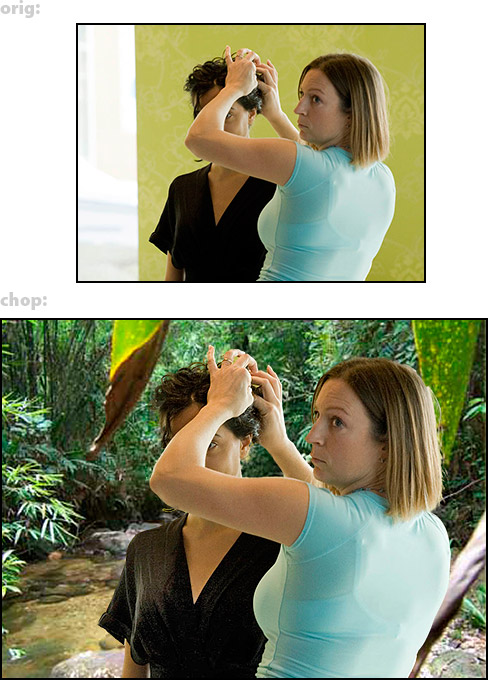
Note: the EXTRACT module can do AMAZING things if you know how it works - it is somewhat fussy, but once you get it figured out it is Very Cool too. I just did the chop below in less than 5 minutes - no touch up afterward.
SO - PEN TOOL: ROCKS
EXTRACT module: ROCKS

(If none of this makes sense, go use the Magic Eraser Tool and learn to love White Nasty Bits On The Edge.  )
_________________
_________________________________
THIS SITE REALLY DOESN'T EXIST
the way our EGO THINKS IT MIGHT!
_________________________________
|
Eve
Site Moderator

Location: Planet Earth
|
 Wed Feb 18, 2009 2:50 pm Reply with quote Wed Feb 18, 2009 2:50 pm Reply with quote
after cutting your object out do this...
Layer/Matting/Defringe
also..
Select/Modify/Contract/Feather/Inverse/Delete
saves some time.

my contribution to this thread. 
_________________
If you're going to walk on thin ice, you might as well dance!
thank u Tawiskaro
|
TutorMe
Site Moderator

Location: Sitting in this room playing Russian roulette, finger on the trigger to my dear Juliet.
|
 Wed Feb 18, 2009 3:49 pm Reply with quote Wed Feb 18, 2009 3:49 pm Reply with quote
Would a video tutorial for the Pen Tool be of use to anyone? I could try to make one tonight when I get home or in the coming days if people are interested.
|
ReinMan

Location: Kingston, ONTARIO, CAN
|
 Wed Feb 18, 2009 3:56 pm Reply with quote Wed Feb 18, 2009 3:56 pm Reply with quote
TutorMe wrote: Would a video tutorial for the Pen Tool be of use to anyone? I could try to make one tonight when I get home or in the coming days if people are interested.
If you can do one that clearly shows how the anchor points and "love" handles work on the Pen Tool, that would be great. It isn't intuitive at first, but there is so much control once learned. A video might help a lot.
Hint: don't do a CONFUSING video.  
_________________
_________________________________
THIS SITE REALLY DOESN'T EXIST
the way our EGO THINKS IT MIGHT!
_________________________________
|
ReinMan

Location: Kingston, ONTARIO, CAN
|
 Wed Feb 18, 2009 6:07 pm Reply with quote Wed Feb 18, 2009 6:07 pm Reply with quote
splodge wrote:
Thanks Splodge! I do have a comment on those tuts... ( I just checked them out...)
I recommend you ignore the tutorial there called PathsCropBG. Man, she does it the HARD way.
The other one, called " penextract" is good, and the dude there teaches the pen tool the way most of us use it. (though he clicks off the handles each time, and he could just have held down the alt key and pulled the handle to a different shape)
But basically he gets you going! 
_________________
_________________________________
THIS SITE REALLY DOESN'T EXIST
the way our EGO THINKS IT MIGHT!
_________________________________
|
Goto page Previous 1, 2, 3 Next
Photoshop Contest Forum Index - Ask the Experts - defaulting ERASER tool to background - Reply to topic
You cannot post new topics in this forum
You cannot reply to topics in this forum
You cannot edit your posts in this forum
You cannot delete your posts in this forum
You cannot vote in polls in this forum
|


