Photoshop Contest PhotoshopContest.com
Creative Contests. Real Prizes. Essential Resource.
You are not logged in. Log in or Register


Photoshop Contest Forum Index - General Discussion - Coffee Slatter = Blood Spatter Tut - Reply to topic

Designed2522

Location: my special place

Post Sat Aug 21, 2010 11:46 am   Reply with quote         


The Credit of this tut goes to Marco as he showed me this a long time ago. I referenced it on one of my entries and am now posting a small tut.

1st step: brew some strong dark coffee (take a sip to get the gitters) and then use a paint brush to splatter drips and spots onto a white piece of paper. (this can be messy so be carefull)


Uploaded with ImageShack.us

2nd Step: now scan the images into your computer and import them into PS. Use Hue/Saturation to change the spots black.


Uploaded with ImageShack.us

3rd Step: The easiest way to make them red in color is to use the color mixer tool and move the contrast bar all the way to the right. I then sometimes use the bevel/emboss tool to add highlights and shadows.


Uploaded with ImageShack.us

there you are blood! Enjoy!!! (thanks Marco)


_________________

annajon

Location: DEAD THREAD DUMPINGGROUND NEAR YOU

Post Sat Aug 21, 2010 12:42 pm   Reply with quote         


thanks for the tutorial,

....... hehe, I keep forgetting that I have a scanner now, so I can create things in real life to use in digital. I used to photograph everything, but that did not always work well....

use scan, make a mental note, use scan


Hagen

Location: Belgium (Dion-Valmont)

Post Sat Aug 21, 2010 2:14 pm   Reply with quote         


Thanks for this mate...! What a quick answer...! Wink...!


roger1

Location: Seattle, WA (US)

Post Sat Aug 21, 2010 2:32 pm   Reply with quote         


Cool tutorial! I've found that using three layers (shadow, highlight, and reflection) and turning off the shadow portion of "bevel" works well.

Here's a link to my PSD file as an example:

http://www.mediafire.com/?lhya77aav2bz67l

[/img]


rett435

Location: Tennessee

Post Sun Aug 22, 2010 4:53 am   Reply with quote         


As a self-proclaimed "know-it-all" I usually don't know how to apply my knowledge, but I usually sit back and critique others' works like they do everything wrong. I hope you don't mind that I chime in, but by the time I completed this post, I believe I have lost a couple years of my life (this was complicated, to say the least....first tut-style post)


Although I don't do this very often, I have discovered through doing other tutorials that there are more realistic ways to make this a useful resource as a brush.

If you first:

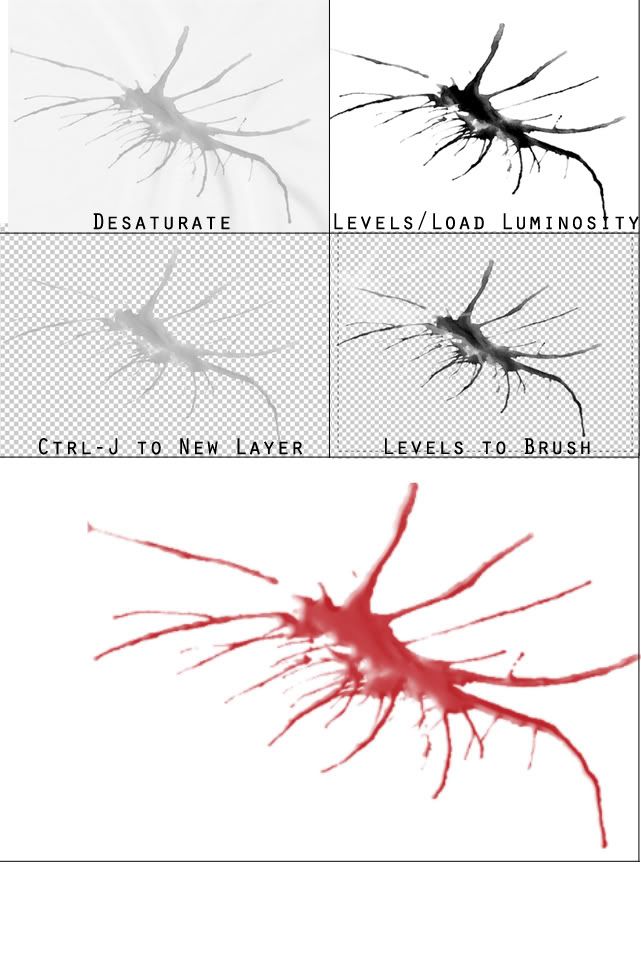
Step 1: Desaturate the image to remove the color information

Image>Adjustments>Desaturate (Ctrl+Shift+U)

Step 2: Open Channels palette and increase the levels of the RGB channel to bring the outline of the splatter to black, and everything else to white. Ctrl-click on the RGB icon to load the luminosity of that channel and inverse the selection (Ctrl+Shift+i). You now have a selection of the splatter without the "gray" of the paper surrounding it.

Step 3: With the current selection still active, select the source layer and move the selected area to a new layer (Ctrl+J). Now you have the original splatter on a layer of it's own.

Step 4: Now you can increase the density of the splatter with Levels making it much more black and retaining most of the shading (this will create transparency in the brush, since black is opaque and white is transparent, shades of gray will be semi-transparent). Once satisfied with the level of black/white on the brush, select it with marquee or lasso tool and go to Edit>Define Brush Preset. This will make all of the black area in your selection into a brush. Brushes are very controllable and can be used in many ways.

Once you've defined your brush, you can open the brushes palette and control the brush any way you see fit....changing the size, shape, scatter, color dynamics, etc, etc. When brushing onto a new layer, you can then change layer styles to create more effects, such as bevel/emboss, drop shadow, inner/outer glow/shadow.


I hope everyone has found this a helpful tip on creating semi-opaque brushes from scratch. This can be very useful when trying to create your own realistic brushes.


Marx-Man

Location: The United Kingdom!

Post Mon Aug 23, 2010 6:52 pm   Reply with quote         


_________________

Tesore

Location: On the way to Utopia!

Post Mon Aug 23, 2010 7:33 pm   Reply with quote         


Bloody good!
Wink


Photoshop Contest Forum Index - General Discussion - Coffee Slatter = Blood Spatter Tut - Reply to topic

You cannot post new topics in this forum
You cannot reply to topics in this forum
You cannot edit your posts in this forum
You cannot delete your posts in this forum
You cannot vote in polls in this forum


Navigate PSC
Contests open  completed  winners  prizes  events  rules  rss 
Galleries votes  authentic  skillful  funny  creative  theme  winners 
Interact register  log in/out  forum  chat  user lookup  contact 
Stats monthly leaders  hall of fame  record holders 
PSC advantage  news (rss)  faq  about  links  contact  home 
Help faq  search  new users  tutorials  contact  password 

Adobe, the Adobe logo, Adobe Photoshop, Creative Suite and Illustrator are registered trademarks of Adobe Systems Incorporated.
Text and images copyright © 2000-2006 Photoshop Contest. All rights reserved.
A venture of ExpertRating.com