Photoshop Contest PhotoshopContest.com
Creative Contests. Real Prizes. Essential Resource.
You are not logged in. Log in or Register


Photoshop Contest Forum Index - General Discussion - Star Field Tutorial - Reply to topic

Goto page 1, 2  Next

TutorMe
Site Moderator

Location: Sitting in this room playing Russian roulette, finger on the trigger to my dear Juliet.

Post Wed Mar 19, 2008 1:14 pm   Reply with quote         


This is a a quick and easy way to make a simple star field in PS.

First, open a new document of any size.

Make two layers and fill them both with black. Your layers palette should look like this:


I named the top layer stars, and the bottom layer background for reference.

Now, on the stars layer, go to Filter>Noise>Add Noise. Use the following settings:

*I may have gotten a little carried away with the arrows... lol Laughing Laughing

Click ok.

Change the stars layer's blending mode to dissolve. And change the opacity to a very low number. I put it at one, but you can mess with it to see what you like. Your layers palette should look similar to this:


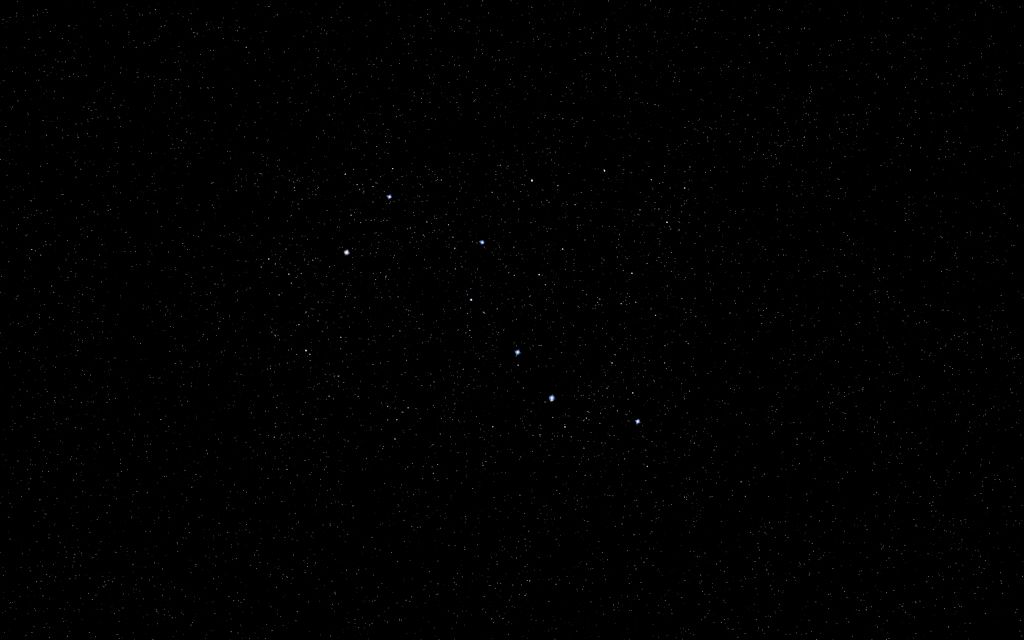
My final result was this:


Full res final can be found here: http://www.breakdown-media.com/images/tutorials/stars/stars.jpg

PSD can be found here: http://www.breakdown-media.com/images/tutorials/stars/stars.zip

-TutorMe


Oscar

Location: Northern California

Post Wed Mar 19, 2008 1:21 pm   Reply with quote         


Pretty nice... it looks real too!


kinetic_be

Location: Belgium

Post Wed Mar 19, 2008 1:32 pm   Reply with quote         


good & simple way. I learned to create rain with the same method, just adding a motion blur to it afterwards.

Also nice to give the stars a more coloured overall-effect, is to go to the layer-style and then gradient overlay, pick a flashy colour from the list and blend it to 15% or something like that.
Saves a lot of work I guess, if you want your stars to look a little bit more random.
Or that's how I usually do it, I'm sure there are better ways.


TutorMe
Site Moderator

Location: Sitting in this room playing Russian roulette, finger on the trigger to my dear Juliet.

Post Wed Mar 19, 2008 1:43 pm   Reply with quote         


Another thing to add to the randomness, is to go to Filter>Distort>Ripple. Use whatever settings you want. It makes it look a little more realistic.

Sample of that:


kinetic_be

Location: Belgium

Post Wed Mar 19, 2008 1:52 pm   Reply with quote         


TutorMe wrote:
Another thing to add to the randomness, is to go to Filter>Distort>Ripple. Use whatever settings you want. It makes it look a little more realistic.


Ah cool. Cheers!


jerry717

Location: Livonia, Michigan

Post Wed Mar 19, 2008 2:46 pm   Reply with quote         


...and for even more realism add at least one known constalation. Wink


_________________
Contemplate this on the tree of woe. -Thulsa Doom

NOGOODSK8RPUNK

Location: hum let me think, oh i know, if you look real hard i sometimes appear in your forum's text box

Post Wed Mar 19, 2008 4:05 pm   Reply with quote         


thats pretty cool thanks and by the way i love the arrows they help


kinetic_be

Location: Belgium

Post Wed Mar 19, 2008 4:47 pm   Reply with quote         


Maybe make a tut: how to make arrows like this?? Razz
They do well, haha


Tarmac

Location: Hotel California

Post Wed Mar 19, 2008 7:16 pm   Reply with quote         


Thanks TutorMe and KB, I have always avoided using dissolve as a layer mode because the results looked too cheezy, but know it can be put to good use. Rain and stars. Thanks for posting this .. Wink


Micose

Location: Quebec (CAN) & France

Post Wed Mar 19, 2008 7:48 pm   Reply with quote         


u should change ur name to Tutoryou! Cool great one buddy!
splodge

Location: Yorkshire,

Post Wed Mar 19, 2008 8:31 pm   Reply with quote         


i think i screwed up the tutorial,


_________________


Hallcross Toots
TutorMe
Site Moderator

Location: Sitting in this room playing Russian roulette, finger on the trigger to my dear Juliet.

Post Wed Mar 19, 2008 8:55 pm   Reply with quote         


kinetic_be wrote:
Maybe make a tut: how to make arrows like this?? Razz
They do well, haha


I used Jing. It's free screen capture software.

http://www.google.com/url?sa=t&ct=res&cd=1&url=http%3A%2F%2Fwww.jingproject.com%2F&ei=w7XhR7jJL53uzASjwom1CA&usg=AFQjCNEJp4LMjIscMVRMO2Kv1oko6r7FuA&sig2=GCNWMj-YyPzPWmrHxoKhlA


Post Wed Mar 19, 2008 8:59 pm   Reply with quote         


Great tip! Was using the brush tool up until now, took forever...


Paul Von Stetina

Location: Deep Shit

Post Wed Mar 19, 2008 9:09 pm   Reply with quote         


It's also important to add 1 Real Star... Shocked Laughing


dumbat

Location: Sydney

Post Wed Mar 19, 2008 9:12 pm   Reply with quote         


MattBlack wrote:
Great tip! Was using the brush tool up until now, took forever...
a good thing about doing it that way though (using scattering and stuff) is that you can also add random variation to the colour


Goto page 1, 2  Next

Photoshop Contest Forum Index - General Discussion - Star Field Tutorial - Reply to topic

You cannot post new topics in this forum
You cannot reply to topics in this forum
You cannot edit your posts in this forum
You cannot delete your posts in this forum
You cannot vote in polls in this forum


Navigate PSC
Contests open  completed  winners  prizes  events  rules  rss 
Galleries votes  authentic  skillful  funny  creative  theme  winners 
Interact register  log in/out  forum  chat  user lookup  contact 
Stats monthly leaders  hall of fame  record holders 
PSC advantage  news (rss)  faq  about  links  contact  home 
Help faq  search  new users  tutorials  contact  password 

Adobe, the Adobe logo, Adobe Photoshop, Creative Suite and Illustrator are registered trademarks of Adobe Systems Incorporated.
Text and images copyright © 2000-2006 Photoshop Contest. All rights reserved.
A venture of ExpertRating.com