Photoshop Contest PhotoshopContest.com
Creative Contests. Real Prizes. Essential Resource.
You are not logged in. Log in or Register


Photoshop Contest Forum Index - Tutorials - GURU ANSWER THREAD - Reply to topic

Goto page 1, 2, 3  Next

blue_lurker

Location: Australia

Post Sun Mar 23, 2008 12:29 am   Reply with quote         


This is where your answers will be posted, so check back here after a guru has replied to your pm.
(Please dont post questions in here or comments lets keep it free for the answers so its easy for all to surf through, thanks)


_________________

Post Sun Mar 23, 2008 11:41 am   Reply with quote         


anfa wrote:
Oops, I meant, how do I get sober and make a chop?


I thought all of your chops were the result of alcohol Laughing Razz

Nevertheless, should you decide to sober up I would suggest starting the chopping day with gallons, liters if you prefer, of piping hot, sugar-laced coffee. Be sure you have easy access to a sanitary and orderly bathroom, one with a weeks supply of toilet paper. A disorganized, filthy, feces covered toiled is not conducive to chopping. Once this is out of the way you will want to plunk yourself down in front of a computer. Take a big gulp of coffee!

    GURU TIP #1: It may help to keep the piping hot joe in your favorite beer mug so that the detox process will proceed with minimal interruption upon your chopping day.


As every decent chopper will attest one cannot chop their best work on a PC so I highly recommend purchasing an Apple computer because damn near anything created on a PC is pure shit. And if it is great, well not only is the chopper a great artist they are a great navigator of bug-infested software and cheap components.

Get the latest and best Apple computer, one with all the extras because knowing you have this in your chopping arsenal will without a doubt infuse you with overwhelming confidence to chop with precision and fury, like a sushi chef on crack. And members of all sexes will perform nearly any sex act you can dream up in lieu of some computing time with your shiny, sexed-up, chopping tool.

Take a big gulp of coffee!

Did I mention the need to purchase a Wacom tablet? This is probably the single most important accessory you could spend the family money on. To chop with a mouse is like trying to carve the family turkey with a spoon. Do it without hesitation. Live on noodles and water if you must, but do it.

    GURU TIP #2: Unless you live a pathetic life and don't go anywere, you will want a portable drawing tablet, one that has a large enough drawing area, yet it doesn't wear you out lugging it from bar to bar or coffee shop to sex shop. I highly recommennd buying a 6"x8" tablet.


Break time! Now visit PSC and spend some time in the chat room or jump into one of the forums and post some jibberish trash talk that will intimidate your fellow choppers, unsettling them, causing them to question their chopping abilities, thus guaranteeing your chops infamy and a slave-like devotion. Be prepared for an onslaught of "..."

Stop! Take a big gulp of coffee! Take another one! You are the MAN!

Now get down on your knees and pray for a miracle, or draw one.


Oscar

Location: Northern California

Post Sun Mar 23, 2008 11:46 am   Reply with quote         


nice Laughing


Post Sun Mar 23, 2008 3:05 pm   Reply with quote         


manic d's hair problems

Hello Manic d

I suggest that you first try the tutorial about hair masking in the tutorial section.Although it was written by ledirlo it's still a pretty good one.

I personally have two options for managing my hair problems:

1: use the clone stamp with the grass brush assigned to it, with a little size and angle variation, take some hair as the source and stamp over the edges to recreate hair tips that look natural, you can as well blur them as you chose to apply the clone on a separate layer.

2: use another program such as Maya Paint Fx that has great fur and hair brushes.


Post Sun Mar 23, 2008 3:21 pm   Reply with quote         


Okay great I am smacking myself for not realizing Led had a tut on it. Thanks for the reply back. Very Happy


Post Sun Mar 23, 2008 11:36 pm   Reply with quote         


Hey Manic,
This is Rey.
I don't think anyone is mad. I think some people are just trying to be silly.
The above answer is a good one. This may help too.
There are many techniques for dealing with hair. Each image is different. A lot depends on the background. If the background is a similar color and darkness as the hair, you are going to have a tough time. Sometimes redrawing hair is the only answer. (or stealing hair from somewhere else and matching the color) If the hair is different enough from the background here is a method you can use. I always use the pen tool to make a selection around the entire body, everything bet the hair. When I get to the hair I just make a close circle around it leaving out as much of the background as possible. I make a selection with this path and put the cutout image on it's own layer. Then I add a layer under it and fill it with a color that is very different from the hair. Now draw a loose lasso selection around the outside of the persons hair. Include the ends of the hair and go to approx where the skull starts. Now use the color range selection tool and select and select the stuff around the hair that you don't want and feather the selection 1 pixel and delete it. You may want to hit delete twice. There may be some outside stuff left that you can just erase. There are also ways of creating masks of the hair using the different channels. Sometimes you can see the shape of the hair better in other channels. There are many methods and many different situations. Maybe Manic, you can post an example image and we could focus on that one. Wink Try this too.
http://graphicssoft.about.com/od/photoshop/l/blrbps_5agirl.htm
Also for drawing some hair edges to replace hair that you could not remove, try this guys brushes. Some are pretty good. Play with them and then you will learn to create your own.
http://graphicssoft.about.com/gi/dynamic/offsite.htm?zi=1/XJ/Ya&sdn=graphicssoft&cdn=compute&tm=47&f=10&su=p284.8.150.ip_&tt=14&bt=1&bts=0&zu=http%3A//www.creativemac.com/2003/08_aug/features/download43030828.htm
Some times to replace hair that I had to cut off I will use the free style pen tool and quickly draw some strands and then with a 1 or 2 pixel brush set to fade I will select the hair color and stroke the paths that I just made. I will come back to this issue and try to explain everything that I just said with pics. It won't be until tomorrow or later but I will get to it. I did these with the free hand pen tool.
http://photoshopcontest.com/images/large/nwj0owzubfsh8jol5xy57b7lyjgry96a6t9t.jpg


I will return. I promise.


Post Sun Mar 23, 2008 11:45 pm   Reply with quote         


Linda Bergkvist has a great tutorial on how to create hair.


Post Mon Mar 24, 2008 12:16 am   Reply with quote         


Hey there Manic, its Blue_lurker here. Im not one of the Gurus, more like a goffa, but I always had trouble masking things like hair and feathers and small leavy branches. I stumbled on this tut by Colin Smith and with some tweeking and practice it works 8 times out of 10.
http://www.photoshopcafe.com/tutorials/masking/masking.htm

Takes a little playing on your behalf but it works quit well


Post Mon Mar 24, 2008 12:33 am   Reply with quote         


I so appreciate all of the wonderful help on this today. Thanks to all the gurus who took the time to answer!


Post Mon Mar 24, 2008 1:05 am   Reply with quote         


Tarmac wrote:
Hello Gurus ... Very Happy

While making Hurricane Season, I ran into a problem making a transparent cloud layer from a NASA photo. After striping out all of the color information that I didn't need, I was left with a transparent cloud comprised of thick and thin areas of white pixels. What surprised me was the cloud had all its coastline references still outlined into the white pixels from the original photo. The black lines were of course empty, there were no pixels in them. But in trying to remove them (or fill them in) everything I did just mucked it up. I tried the clone stamp tool, but it left a visible white trail of pixels where the outlines were. I tried the Healing Brush Tool as well as the Patch Tool, but both caused obvious blurred paths along the outlines. The solution I came up with, was to duplicate the cloud layer, and select the layer below it, shifting the entire image two pixels left and two pixels up. That sort of worked but caused the overall image to blur.

My question is, .. is there another way, one that I'm missing to remove or fill in these lines when working with a transparent object?

Here is the problem: 1.) Overall Side by Side and 2.) And In Close Up Detail

The PSD file is here. (about 7 MB file size)

The original image from NASA is here (Warning its big - an 8.28 MB size image)

Thanks in Advance for anything you come up with,

Bob/Tarmac ..Smile
Hello, Tarmac, vokaris here.
I downloaded your files and had a look. The obvious answer would be to clean up the dark outlines in the original NASA source photo before copying the cloud to your composite.

If you're stuck with what you have in your layered file:


Set the cloud layer to Normal mode and set the the healing brush to NOT use all layers. Turn the layer back to Pin Light when you're done with the cleanup. It should work OK:


You may be running into strange unwanted artifacts because you're trying to use the healing brush in an overlay mode (Pin Light) with the "Use All Layers" option set to ON.


Post Mon Mar 24, 2008 11:14 am   Reply with quote         


Here is a hair sample to experiment with. Maybe some of the gurus would like to give this one a try and share their method.
Try to remove the girl and put here in another room.


Tarmac

Location: Hotel California

Post Mon Mar 24, 2008 11:29 am   Reply with quote         


Sometimes the hardest problems have the simplest solutions. Vokaris, thank you so very much for showing me what was starring me in the face. I am now absolutely sure it was Artifacts in the Pin Light layer mode that was messing me up while I was cloning and healing the cloud layer. Also not unchecking 'Use All Layers' was my other mistake. My problem just needed a fresh set of experienced eyes to find the simplest solution. Thank you again Volkaris, and thanks als to Blue for setting this new PSC resource up for us .. ! Very Happy


Post Mon Mar 24, 2008 1:40 pm   Reply with quote         


Hi. It's me Rey. I'm back.
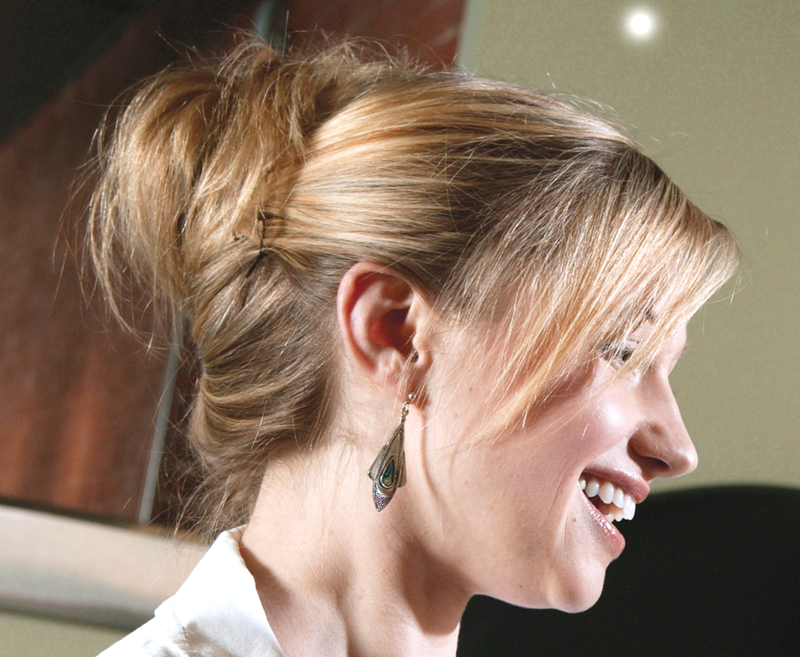
This is a quickie example of redrawing hair.
First I picked a pain in the ass image.

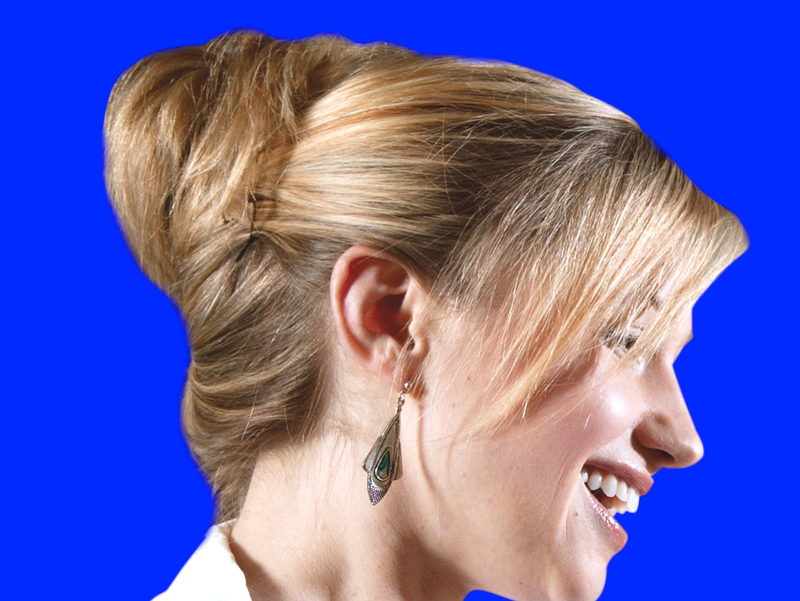
The I cut a path around the body and cut most of the impossible threads out until I got this.

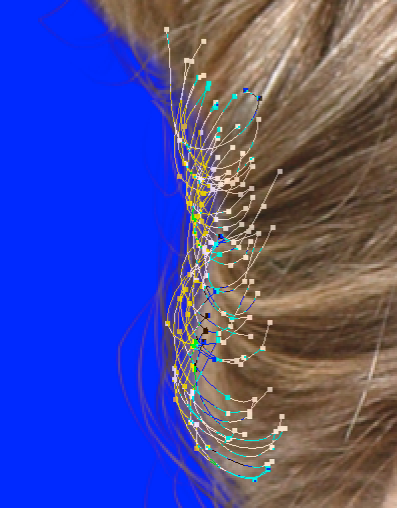
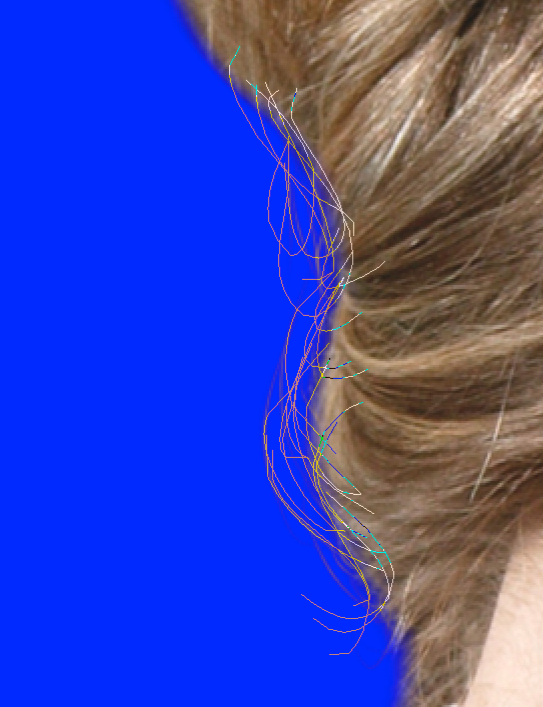
Then using the freehand pen tool I start quickly drawing strands of hair.

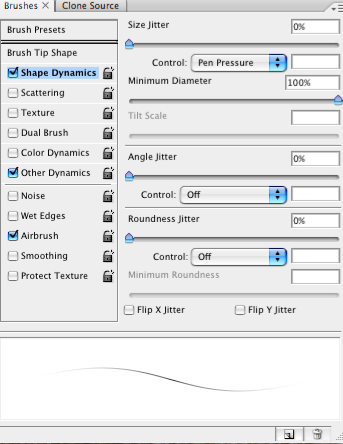
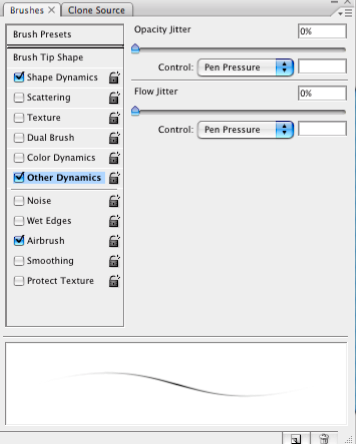
Then create a 1 or 2 pixel brush with these settings.
Pick a color from the area of the hair next to where you are working.

\

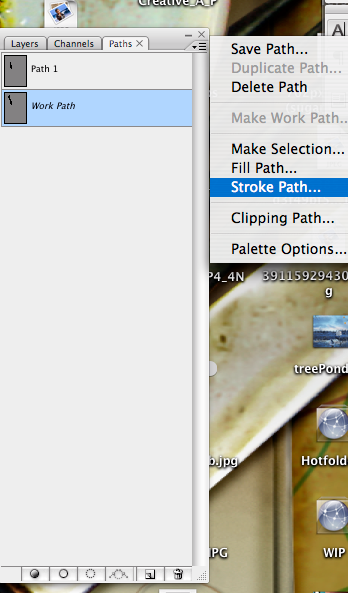
Then go to your path palette and go to Stroke path

Check off simulate pressure and make sure the brush tool is chosen.
You'll get something like this.


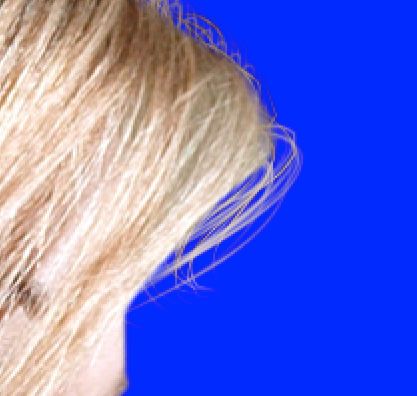
Repeat this process all around the head changing up the colors. Add another background. Erase parts of the hair that you do not need with a soft eraser. You should get something like this.


When doing this. Be loose while drawing the strands. make them look random. Have fun. Sometimes erasing some of them with the eraser set to 25% gives a nice look.
Remember, this was a quickie so take your time, make cleaner selections than I did. Pick and chose where your strands go with care. Don't rush it or it won't look natural. Mines not quite there yet.


ReyRey

Location: In a world of $#!t

Post Mon Mar 24, 2008 2:55 pm   Reply with quote         


Your supposed to be looking at her hair. Raising Brow That's the area way above the chest. Cool


_________________
I try to think, but nothing happens.
Splodge..you rock!! Wherever you are.
I keep checking the obituaries to see if my name is there. If it's not, then I figure I'm ok.
ReyRey

Location: In a world of $#!t

Post Mon Mar 24, 2008 10:09 pm   Reply with quote         


Cool


_________________
I try to think, but nothing happens.
Splodge..you rock!! Wherever you are.
I keep checking the obituaries to see if my name is there. If it's not, then I figure I'm ok.

Goto page 1, 2, 3  Next

Photoshop Contest Forum Index - Tutorials - GURU ANSWER THREAD - Reply to topic

You cannot post new topics in this forum
You cannot reply to topics in this forum
You cannot edit your posts in this forum
You cannot delete your posts in this forum
You cannot vote in polls in this forum


Navigate PSC
Contests open  completed  winners  prizes  events  rules  rss 
Galleries votes  authentic  skillful  funny  creative  theme  winners 
Interact register  log in/out  forum  chat  user lookup  contact 
Stats monthly leaders  hall of fame  record holders 
PSC advantage  news (rss)  faq  about  links  contact  home 
Help faq  search  new users  tutorials  contact  password 

Adobe, the Adobe logo, Adobe Photoshop, Creative Suite and Illustrator are registered trademarks of Adobe Systems Incorporated.
Text and images copyright © 2000-2006 Photoshop Contest. All rights reserved.
A venture of ExpertRating.com