By: irishstu
It used to be a lot of work to make realistic-looking wood in
Phototoshop, then Photoshop CS came along with its extra fancy filters,
especially the one were going to use today, the Fibers filter. Now its as easy as one, two, three. Just follow this simple tutorial.
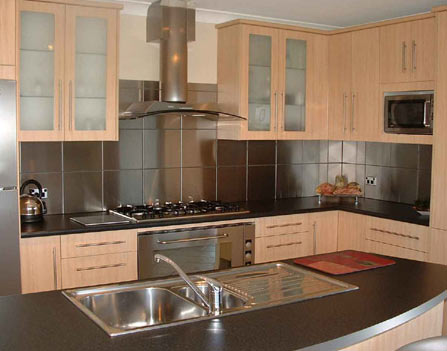
As an example, I was asked if I could make a realistic-looking wooden worktop for the following image.
Note that this is not a tutorial about cutting, pasting, etc. Its
about creating simple wood, so I wont go into much detail about the
other stuff.
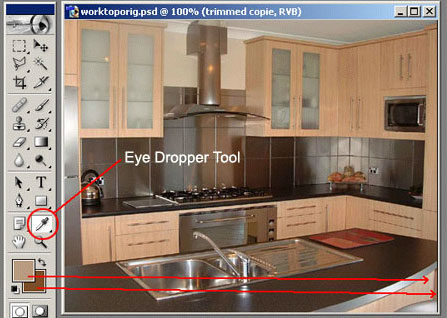
1.Defining the Colors
Firstly, we need to define the color of the wood and to do this we are going to use the Eye Dropper tool. We want a light brown for the foreground and a dark brown for the background.
In order to make the wood match the original as much as possible, we
are going to choose shades from the wood in the source picture.
The red arrows below show where the Eye Dropper tool can choose the colors from. Note that when you click on the Set Foreground Color or Set Background Color boxes (to the left of the red arrows in the diagram below), the Eye Dropper tool will automatically appear. There is no need to choose it from the toolbar.
2.Create a New Layer
Now that we have defined our colors, create a new layer, select all, and fill with the new foreground color.
3.Time to Make the Wood
One thing you should know about the filter we are about to use is that it creates vertical grain lines, and in this particular case, we really want horizontal lines, so first rotate the canvas 90 degrees (Image>Rotate Canvas> 90 degrees CW). Now choose Filter>Render>Fibers.
You will see what looks like wood, though we need to make a few
adjustments. As our source picture has quite a close grain, with fairly
straight lines, we need to adjust the options accordingly, so slide Variance down to 1.0 and Strength up to 64.0, then click OK. We should end up with something like this.

Now rotate the canvas back 90 CCW.
4. Getting the Perspective Right
All we need to do now is get the perspective right on the wood, so that
it doesnt look like its sitting at the wrong angle. To do this,
choose Edit>Transform>Distort.
Now grab each of the four corners and place them as follows.
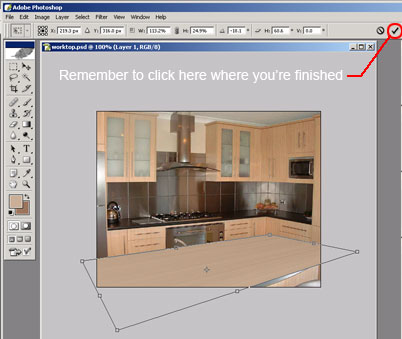
Once we are happy with the basic shape, we need to click on the tick in the top right hand corner.
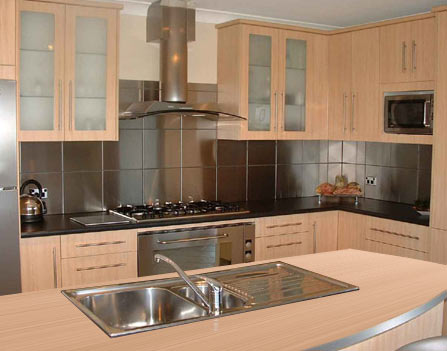
5.Finishing Off
Now we just need to trim the edges of the worktop, and cut out the sink
to place on top. Take your time on the cutting out and you should end
up with something like this.
If you find that the colors dont quite match up, then instead of starting again, try fine tuning with either Image>Adjust>Brightness/Contrast or Image>Adjust>Hue/Saturation.
And there you have it, a simple DIY wood tutorial.
� all photoshop tutorials
|